

POPULAR AT FAMILY HAVEN
POPULAR AT FAMILY HAVEN
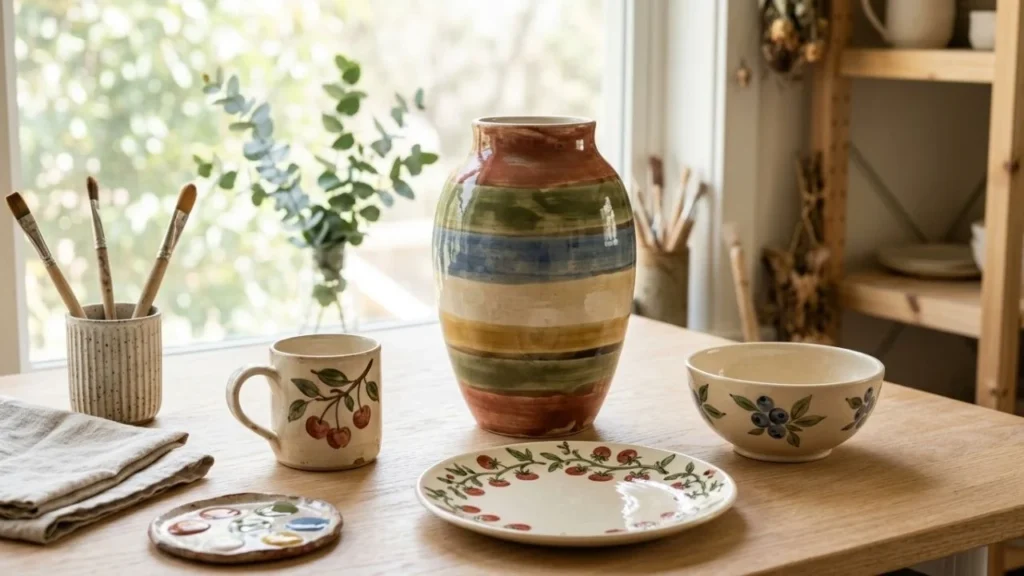
A blank mug has a strange ability to erase every idea you saved before you walked into the pottery studio.
You can have 40 pottery painting ideas on your phone and still stare at one white bowl wondering why none of them belongs there.
The problem is often the shape, not the idea.
A tiny bow can look playful on a mug but disappear on a tall vase. Wide retro bands can make sense on a vase but overpower a little ring dish.
This guide starts with the pottery shape first.
Pick the surface, choose the size of the pattern, settle on three colors, and decide where the painting stops. The actual painting gets much easier after those four choices are made.
Each pottery form gives you natural places for a pattern to begin and end.
| Pottery piece | Designs that suit the shape | Easy first choice |
|---|---|---|
| Mug | Small repeats, wraparound bands, handle accents | Cherries |
| Plate | Rim borders, center motifs, radial patterns | Scallops |
| Bowl | Exterior rings, fruit borders, center motifs | Berries |
| Vase | Vertical vines, large flowers, broad bands | Retro stripes |
| Planter | Color blocks, faces, large repeats | Two-tone design |
| Trinket dish | One main motif, checks, small borders | Bow |
A good rule is to increase the motif size as the pottery gets larger.
Twenty little cherries can suit a mug. Put the same tiny cherries across a tall vase and they may look more like red dots from across the room.
1. How will the pottery be used? A decorative vase gives you different choices from a bowl that will hold cereal every morning.
2. Which three colors are you using? Pick a light shade, a darker shade, and one accent.
3. How large is the motif? Bigger pottery can usually handle a bigger pattern.
4. Where does the painting stop? Decide whether you are painting the rim, lower half, exterior, one side, or nearly the whole piece.
Quick pottery rule: Before deciding what to paint, point to the exact part of the pottery where the design will live. A clear boundary can save a simple idea from becoming an overcrowded one.
Beginner designs work best when small differences between brush marks still look natural.
Checks, stripes, scallops, dots, loose flowers, and larger shapes are forgiving because they depend on repetition rather than tiny detail.
Skip a tiny black-and-white grid and paint larger checks in two softer colors.
Try burgundy and blush, cobalt and pale blue, sage and cream, or rust and peach. Moving one row slightly can also make the pattern feel less rigid.
Sketch the main divisions before painting so you know how the pattern will meet at the back.
For larger masked areas, ScotchBlue painter tape (paid link) can help create a temporary edge if your pottery studio allows tape on its bisque. It is a general painter’s tape, so follow the studio’s rules rather than assuming every bisque surface should be taped.
Paint three to five broad stripes around a mug, planter, bowl, or vase.
Change the stripe widths so the pattern does not depend on every line being exactly the same.
Leave a thin strip of bare ceramic between two strong colors if the shades begin to blur together visually.
The Soucolor detail brush set (paid link) includes several pointed-round sizes, which lets you switch brush widths instead of trying to make one tiny brush fill every stripe. Amazon lists the set for ceramic work as well as other painting surfaces.
Paint a row of half circles around a plate rim, bowl edge, planter, or small dish.
One color is enough, but adding a tiny dot under every second scallop can make the border feel more finished.
Paint the scallops a little larger than you first think. Tiny half circles are harder to repeat neatly around a curve.
The different tip sizes in Clatoon pottery dotting tools (paid link) can help with the small dots beneath the scallops when the studio’s color system works with the tool.
Use small irregular marks across most of the piece, then add one strong band near the base or rim.
The band gives the scattered marks a stopping point and keeps the pottery from looking unfinished.
You can keep the speckles concentrated near one end and reduce them gradually toward the other.
A small pointed brush from the Soucolor detail brush set (paid link) gives you more control if you prefer placed speckles rather than flicking color around a shared studio table.
Paint simple five-petal flowers with plenty of unpainted ceramic between them.
Keep the basic flower shape the same but change the centers between two accent colors.
This is easier than painting a complete bouquet and suits mugs, small plates, bowls, and trinket dishes.
Use one of the smaller brushes from the Soucolor detail brush set (paid link) for petals, centers, stems, and tiny leaves.
Paint two or three large curved shapes instead of drawing a recognizable object.
Let bare ceramic separate some of the blocks so each color remains visible.
This is one of the simplest modern pottery painting ideas for someone who likes color more than detailed drawing.
A medium pointed brush from the Soucolor detail brush set (paid link) can help fill the edge first, then move inward while the shape is still easy to see.
A mug gives you three useful areas: the body, the handle, and the space near the rim.
The best mug patterns use the handle as part of the design rather than remembering it after everything else has dried.
Paint little bows around the mug body, then repeat the darkest bow color on the handle.
Burgundy with dusty pink, forest green with pale yellow, or navy with powder blue can keep the design playful without needing six colors.
Draw each bow as two loose loops with a center knot.
The smaller tips in the Soucolor detail brush set (paid link) suit the loops and short ribbon tails without requiring a large brush to make tiny turns.
Paint pairs of red cherries with short green stems.
Make one pair slightly larger near the handle, then use smaller pairs around the remaining exterior.
Leave clear ceramic between the clusters. Cherries lose their charm quickly when the entire mug starts looking like the produce section.
The round ends on Clatoon pottery dotting tools (paid link) can help place repeated circular berry or cherry shapes before you add stems with a small brush.
Build a loose gingham pattern with broad horizontal and vertical bands.
Choose two shades from one color family, such as pale blue and navy or sage and forest green, then make the crossing areas darker.
Do not make the bands too narrow. A mug has enough curve without asking you to paint 40 miniature squares.
If the studio permits broad masking, ScotchBlue painter tape (paid link) can help mark larger sections. Ask before applying tape to bisque, since the tape is not sold specifically as a pottery-studio product.
Paint the exterior dark blue, then add cream stars and one larger crescent moon.
Leave more dark space than you think you need. A night sky looks stronger when every empty spot does not receive another star.
Use different star sizes instead of trying to repeat one perfect symbol.
Clatoon pottery dotting tools (paid link) are useful for round star centers and small dot-like stars, while a fine brush can add points and the crescent.
Paint a row of simple blue fish around the lower half of the mug.
Keep each fish to a body, tail, and tiny eye, then add a thin rust, red, or yellow line above the row.
Make the fish face the same direction so the repeat wraps naturally around the mug.
The Soucolor detail brush set (paid link) gives you a broader small brush for the bodies and a finer one for tails, eyes, and the thin line.
A plate already divides itself into two zones: rim and center.
Choose one to carry most of the decoration instead of covering both with equal detail.
Paint small red tomatoes around the outer edge, then connect them with a thin winding green stem.
Add only a few leaves between the tomatoes and keep the center open.
The connected vine makes the pattern feel intentional while still using basic shapes.
You can place similar-size tomato circles with Clatoon pottery dotting tools (paid link), then add the vine and leaves with a fine brush.
Paint simple blue fish moving clockwise around the rim.
Place small dots or wave marks between them, but keep the middle of the plate quiet.
This pattern works because the plate’s circular edge already gives you the route.
A fine brush from the Soucolor detail brush set (paid link) can handle the bodies, tails, and wave marks without changing tools for every small section.
Start with a small circle in the middle, then paint broad rays moving toward the rim.
Use two or three colors and alternate them around the plate.
Wider rays are easier for a beginner than thin ones, and they still make use of the plate’s round shape.
The range of round brush sizes in the Soucolor detail brush set (paid link) lets you choose a wider tip for the rays and a smaller one for the center.
Paint a two-color checkerboard around the outer rim and leave the center plain.
Add one loose wavy line along the inside edge of the checker pattern.
The wave softens the strict geometry and means the entire plate does not need to look measured.
For broad divisions, ScotchBlue painter tape (paid link) can help when the studio permits masking on its bisque.
Paint one large flower in the center with petals reaching toward the rim.
Add two or three leaves rather than filling every open area with smaller flowers.
The scale is what makes this idea work. One confident flower can look stronger on a plate than twenty tiny ones fighting for space.
Use a larger tip from the Soucolor detail brush set (paid link) for the petals and a smaller tip for the center and leaves.
The easiest pottery painting bowl designs follow the curve.
Think borders, rings, berries, fruit slices, exterior flowers, and small center motifs instead of rigid pictures that need a flat surface.
Paint small blueberry clusters around the exterior near the rim.
Use two blue shades and a few green leaves so the berries do not read as one row of identical dots.
Leave the lower half mostly plain.
Different tip sizes in Clatoon pottery dotting tools (paid link) make it easy to change berry sizes while keeping the clusters related.
Paint half lemon slices around the lower exterior.
Add a few simple leaves, then leave an open band near the rim.
Make each lemon large enough that painting the inside segments does not become a tiny-detail exercise.
The smaller pointed brushes in the Soucolor detail brush set (paid link) suit the lemon outlines, inner sections, and leaves.
Use one calm shade on the outside and a stronger contrasting shade on the inside.
Repeat the inner color as one thin exterior line under the rim.
This gives you a finished design without drawing any motif at all.
A larger brush from the Soucolor detail brush set (paid link) can help around the edge, but use only the color and firing system approved for your bowl’s intended use.
Paint two or three uneven rings around the exterior.
Try terracotta, peach, and cream or cobalt, pale blue, and white.
Let each line move gently up and down as it circles the bowl. Trying to make a curved bowl look machine-striped usually creates more work than it solves.
A pointed round from the Soucolor detail brush set (paid link) can hold enough color for a longer line while still giving you control around the curve.
Build one repeat unit using a tulip-like flower, two leaves, and a few dots.
Repeat that unit around the outside instead of making every flower different.
This gives the bowl more personality than a tiny daisy pattern while keeping the drawing manageable.
Use the Soucolor detail brush set (paid link) for the flowers and leaves, then add round accents with the end of a studio-approved dotting tool if needed.
A vase gives you height.
Use that height for broad bands, vertical lines, long vines, one large flower, or a simple landscape instead of spending an afternoon painting 200 tiny icons.
Paint four or five wide bands around the vase.
Try rust, olive, mustard, dusty blue, and cream, then vary the width of each band.
You can also leave one narrow band completely unpainted between two stronger colors.
If your studio permits broad masking, ScotchBlue painter tape (paid link) can help establish larger divisions before the color goes down.
Paint one large branch rising from the lower side toward the neck.
Add broad leaves and two or three flowers, then let part of the branch disappear around one side.
The opposite side can stay mostly open.
Use several pointed sizes from the Soucolor detail brush set (paid link) so the stem stays thinner than the flowers and leaves.
Paint large arches that stack vertically.
Use two colors plus the bare ceramic rather than filling every section.
A tall vase gives the arches enough room to repeat without turning them into tiny rainbow symbols.
The Soucolor detail brush set (paid link) gives you enough brush-size choice to outline an arch first and then fill the larger shape.
Paint thin lines from the base toward the neck.
Leave a wider gap after every fourth or fifth stripe, then add one thicker accent line.
This is a better choice for a steadier hand than a first pottery session.
A small pointed brush from the Soucolor detail brush set (paid link) is the better match here because the line needs to stay narrow over a longer distance.
Paint one simple horizon around the vase.
Add low hills, a sun, and a few tree or flower shapes using broad flat forms instead of tiny scenery details.
The picture appears gradually as someone turns the vase, which makes the shape part of the idea.
Use the Soucolor detail brush set (paid link) to move between the larger hills and the smaller tree or flower details without relying on one brush size.
Planters, spoon rests, ring dishes, and trinket dishes are good places for larger symbols.
Because the surface is smaller, a bow, face, moon, or checkerboard can fill it without needing much else.
Paint one large ribbon bow in the middle.
Add a narrow border using the darkest color from the bow and leave the remaining surface plain.
Burgundy and pink, navy and pale blue, or green and cream can each change the feel without changing the drawing.
A fine brush from the Soucolor detail brush set (paid link) can handle the loops, center knot, tails, and thin rim line.
Paint two eyes, eyebrows, a short nose line, and a small mouth on one side.
Once the plant goes in, the leaves become the hair.
The plant has now volunteered for half the decorating work. That seems fair.
Use a small pointed brush from the Soucolor detail brush set (paid link) so the features stay simple rather than turning into a detailed portrait.
Paint large rounded checks across the middle and leave the outer edge plain.
Two colors are enough, especially on such a small surface.
If the spoon rest will be functional, make sure the studio confirms that its ceramic color and firing process suit that use.
For larger blocked sections, ScotchBlue painter tape (paid link) may help if the studio approves tape on its bisque.
Paint one crescent moon in the center.
Add a loose ring of small stars and dots around it, then stop before the edge becomes crowded.
Navy, cream, and muted yellow work well, but dusty lavender and dark blue can give the same idea a softer look.
The different ends on Clatoon pottery dotting tools (paid link) can help vary the small stars and dots around the moon.
Better pottery painting ideas still need decent spacing and surface preparation.
At a studio, follow its instructions for cleaning bisque, applying color, drying, glazing, and firing. Do not bring your own glaze or paint into the process unless the studio says it is compatible.
Mayco’s current underglaze product guidance says its Fundamentals colors are generally applied in two to three coats and can be used on clay or bisque across its stated firing range. It also recommends testing on the specific clay body and kiln being used.
That does not mean every studio color needs two to three coats.
The label or studio instructions for the material actually in front of you should decide that.
For a repeat pattern, sketch the spacing on paper before the pottery.
You do not need a detailed drawing. A rough count such as “eight flowers around this rim” or “four wide bands down this vase” is enough to avoid discovering at the end that your pattern has room for half a flower.
Three colors are enough for most beginner pottery painting ideas.
Think of them as a light color, a main color, and a smaller accent.
Try:
Do not judge a fired ceramic color only by how it looks wet.
Mayco says underglaze results can differ by clay body and firing conditions and recommends testing in the actual clay and kiln system.
If the studio has fired sample tiles, look at those before making the final color choice.
That ten-second check can tell you far more than staring at a wet swatch and hoping for the best.
Studio pottery and at-home ceramic painting are two different processes.
| Question | Pottery studio bisque | Finished ceramic at home |
|---|---|---|
| Starting surface | Usually bisque | Already finished ceramic |
| Color system | Studio-selected glaze or underglaze | Product-specific ceramic paint or marker |
| Finishing | Usually kiln firing | Drying or heat curing as directed |
| Food use | Ask before painting | Read maker’s food-contact limits |
| Main rule | Follow studio system | Follow exact product label |
Mayco says Fundamentals underglazes need an appropriate clear or other sealed, chemically durable glaze for dinnerware use.
At-home ceramic paint follows its own rules.
For example, Pébéo’s food-contact product guidance says Porcelaine 150 decoration should be limited to surfaces not intended to touch food. Its current instructions say some products can become dishwasher resistant after the specified drying and oven process, but that does not change the food-contact restriction.
Dishwasher resistance and food-contact suitability are not the same claim.
Functional pottery needs more care than a decorative vase or ring dish.
A glossy surface by itself does not prove that a bowl, plate, or mug is suitable for eating or drinking.
Mayco’s dinnerware safety guidance explains that some fired glazes can meet food-safety testing yet still be unsuitable for dinnerware because of surface durability or textures that are difficult to clean.
The FDA’s ceramic pottery guidance also explains that lead from improperly made ceramic glaze or decoration can move into food or drinks. FDA advises against using pottery for food when its suitability cannot be established.
If you are at a paint-your-own-pottery studio, tell the staff before you begin that you intend to eat or drink from the piece.
That gives them the chance to tell you which bisque, glaze system, placement, and firing process belong with your intended use.
Wide stripes, scallops, larger checkerboards, loose flowers, dots, waves, and color blocks are good starting points.
They still look natural when one brush mark is slightly different from the next.
A mug, bowl, small plate, planter, or trinket dish gives you enough room to try a pattern without creating a huge job.
Choose one motif and three colors before you start.
Small repeats, cherries, bows, gingham, simple flowers, wraparound bands, fish, and celestial motifs fit mugs well.
Remember the handle when choosing the color plan.
Fruit borders, scallops, rings, waves, exterior flowers, and simple center motifs work well because they follow the curved shape.
Large rigid pictures are harder to fit around a bowl.
Broad stripes, vertical lines, large flowers, arches, long vines, and wraparound landscapes use the vase’s height well.
Large motifs are also easier to see from across a room.
Bisque is pottery that has already gone through an initial firing and is ready for later decoration or glazing steps.
The studio can tell you which ceramic colors and firing process belong with its bisque.
Underglaze is ceramic color made to be fired on clay or bisque.
The application, firing range, glaze pairing, and dinnerware suitability depend on the exact product.
A quick paper sketch helps with pattern spacing, color order, motif size, and the stopping point.
At a studio, ask which marking method is acceptable on its bisque.
Three main colors are enough for most beginner pieces.
A fourth shade can work when it has one clear job, such as a tiny outline or accent.
Masking can be useful for some studio techniques, but the method depends on the bisque, glaze, and studio process.
Ask before putting adhesive tape on a studio piece, even if you brought the tape yourself.
Yes, when the chosen product is intended for that ceramic surface and you follow its drying or curing instructions.
Check food-contact restrictions separately because a washable or dishwasher-resistant finish does not automatically mean the decorated area belongs against food.
No.
The ceramic body, decoration, glaze, firing, final surface, and intended use all matter. FDA and ceramic manufacturers publish separate guidance for food-use and decorative ceramicware.
The strongest pottery painting ideas look as if the design belongs on the piece.
A mug gives small repeats somewhere to travel. A plate gives a border somewhere to sit. A bowl gives a pattern a curve to follow, and a vase gives a larger design room to stretch.
Choose the object first.
Then choose three colors, one main pattern, and a stopping point.
Your goal is not to squeeze every saved idea onto one ceramic piece.
Finish one design that still makes sense when you turn the pottery around.
Explore original printables, find another story or save your next creative project.


[…] is enough decoration. If you want more ideas for painted finishes and color combinations, these pottery painting ideas can help you choose a direction without overcrowding the […]