

POPULAR AT FAMILY HAVEN
POPULAR AT FAMILY HAVEN
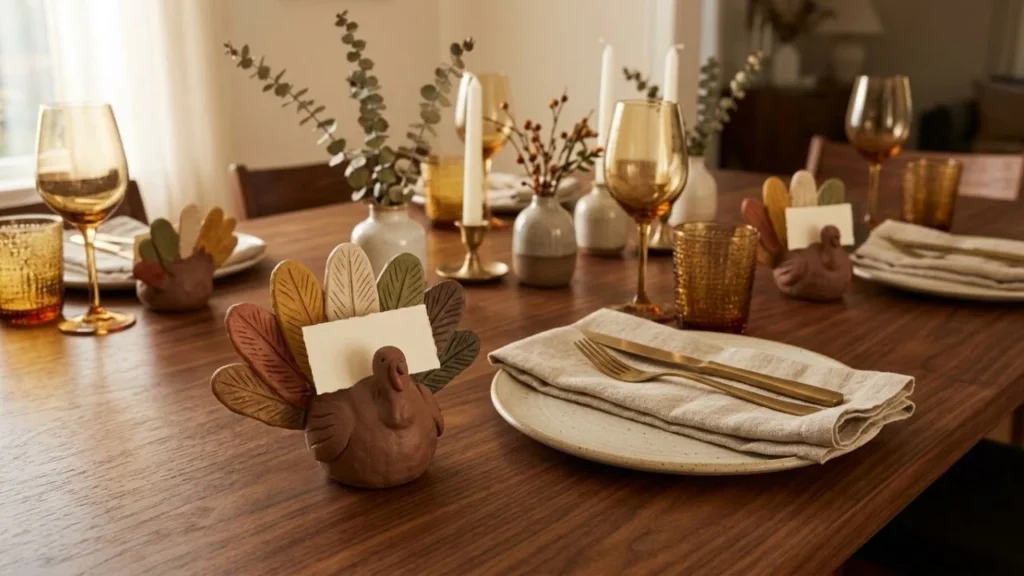
Thanksgiving clay projects can begin with simple gratitude tokens, blessing pebbles or pressed-leaf shapes before you try a more detailed table decoration.
There is a difference between a Thanksgiving decoration you store and one you look for every November.
A clay feather with a child’s handwriting on the back can become the second kind. So can a tiny recipe plaque, a place-card turkey with Grandma’s name, or a little house that glows on the mantel during dinner.
These Thanksgiving clay projects are built around that idea. You are not just filling an afternoon. You are making useful table pieces, fall decor, small family traditions, and keepsakes that can pick up meaning each time they return.
You do not need a kiln for the air-dry versions. If you want extra inspiration before choosing your first piece, these show how the same material can become ornaments, dishes, magnets, decor, and gifts.
A little planning saves a lot of cracked stems, sagging handles, and paint applied to clay that was still damp inside.
Start with a shape that does not depend on six tiny parts staying attached.
| Project | Best for | Difficulty | Good with children? | Main skill |
|---|---|---|---|---|
| Blessing pebbles | Dinner activity | Easy | Yes | Hand shaping |
| Pumpkin gratitude tokens | Kids’ table | Easy | Yes | Rolling and cutting |
| Acorn pocket stones | Gratitude bowl | Easy | Yes | Small forms |
| Leaf story garland | Family keepsake | Easy | Yes | Leaf impressions |
| Gratitude feather ornament | Annual keepsake | Easy | Yes | Cutting and marking |
| Recipe plaque | Kitchen keepsake | Easy-medium | Yes, with help | Stamping |
| Turkey place cards | Dinner table | Easy-medium | With help | Joining small pieces |
| Pumpkin pie dish | Catchall or favor | Easy-medium | Older children | Shaping a slab |
| Feather trinket bowl | Entry or bedside dish | Easy-medium | Older children | Layering forms |
| Pumpkin mug ornament | Hanging decor | Medium | Older children | Small sculpting |
| Harvest wagon | Shelf decor | Medium | Older children | Assembly |
| Corn-husk ring | Table accent | Medium | Adult-led | Curved forms |
| Vegetable magnets | Fridge decor | Medium | Adult finishing only | Miniatures |
| Mini cornucopia | Buffet or shelf | Medium | Older children | Hollow shaping |
| Clay house luminary | Mantel display | Medium | Adult-led | Slab construction |
For a wider look at easy shapes, tools, and family-friendly options, this guide is a useful companion.
White air-dry clay gives you complete control over the final palette. Terracotta clay can look beautiful left partly exposed beneath rust, cream, olive, or cocoa paint.
If you need a standard block for smaller pieces, DAS air-dry clay is currently listed on Amazon.com USA as a white 2.2-pound air-hardening modeling clay. For a group session or a larger batch, Crayola bulk clay is listed as a 5-pound natural-white air-dry clay.
You can still make most ideas with the clay you already own. Check its package instructions first because drying, finishing, and recommended use can differ by brand.
A rolling pin, toothpick, drinking straw, fine sandpaper, small brushes, and a smooth work surface will cover most of the list.
If you want dedicated shaping tools, this clay sculpting tool set contains 27 pieces for carving, dotting, molding, and shaping. You do not need it to begin, but it becomes useful once you start adding feather lines, leaf veins, plank marks, and miniature produce.
Handles, stems, heads, wheels, and tiny decorations need more than a gentle press. Lightly roughen both meeting surfaces, add only a little moisture, press them together, then smooth the seam.
A Beautiful Mess uses crosshatching and moisture when attaching air-dry clay features in this tutorial. That technique is useful for the turkey head, mug handle, wagon wheels, and house details below.
A place card normally does its job for a few hours. This turkey can mark a seat, add height to the table, and go home with the guest afterward.
Form a rounded body with a slightly flattened base so it stands without wobbling. Add a smaller head, roughening both joining points before you press and smooth the seam.
Make five or six flattened feather shapes and arrange them behind the body in a loose fan. Add a small beak and wattle, then scratch shallow feather lines with a toothpick.
Form a short clay block behind the turkey and cut a narrow slot while the clay is still soft. Test the opening with spare cardstock before drying.
Use rust, mustard, cocoa, cream, and muted olive instead of a rainbow of bright primary colors. If the place cards will sit in a kitchen or breakfast area, these fall kitchen decor ideas can help you repeat the same tones nearby without covering every surface in seasonal objects.
Everybody expects a pumpkin in November. A small slice of pumpkin pie gets the same seasonal message across with a little more personality.
Roll an even slab of clay and cut a circle using a small bowl as your guide. Divide it into pie-shaped sections and keep one.
Rest that section over a folded towel or shallow form so the edges lift slightly. Roll a thin strip for the crust and press it along the curved edge, pinching a few uneven ridges to suggest baked pastry.
After the clay is fully dry, paint the center in pumpkin, cinnamon, and warm brown. Use cream and tan on the crust, letting a little variation show instead of painting one flat block of color.
Keep rings, earrings, wrapped sweets, keys, or folded notes inside. Sculpey says its clays and glazes are not recommended for dishes or utensils intended for direct or indirect food contact, even after glazing. clay food-use guidance
These are small enough for a child to shape and substantial enough to use as table tokens, lunchbox notes, or pieces in a gratitude bowl.
Roll each piece into an egg shape and flatten the wider end just enough to stop it rolling away. Press tiny dots into the upper third, then dab crumpled foil over that section to break up the pattern and make the cap less uniform.
Paint the cap walnut brown and the lower section beige, caramel, or warm tan. Once dry, write one short word on the bottom: Home, Grace, Joy, Family, Hope, Kindness, Thanks, Together.
Put the finished acorns into a wood bowl before dinner. Guests can choose one without turning the meal into a formal activity.
This one works when you want a clay project that reads more like fall home decor than a classroom activity.
Cut a small rectangular base from an even slab. Add low side panels and smooth the corners until the body looks connected rather than assembled from separate strips.
Cut four matching wheels and attach them firmly. Score shallow horizontal lines into the wagon body to suggest wood planks.
Fill it with tiny pumpkins, apples, pears, squash, and corn. Make the produce slightly oversized for the wagon so the shapes remain easy to read after paint is added.
One wagon on an entry console can look intentional. A wagon surrounded by ten pumpkins, three signs, beads, baskets, leaves, and another wagon starts competing with itself.
If you are using it near the front door, these fall entryway decor ideas can help you build the rest of the vignette around fewer, stronger pieces.
Long clay leaves painted in wheat and tan can suggest curled corn husks without needing real dried plant material on the table.
Roll six to eight long leaf forms. Press one center line into each, then add finer diagonal marks. Let the pieces rest over rolled cloth or loose foil while they begin to firm so they dry with gentle bends rather than lying flat.
Arrange the wider ends into a ring and blend the joins. Add a few tiny clay berries only if the gaps need them.
Paint the leaves in wheat, toasted beige, soft brown, and a touch of olive. Place a battery-operated tealight in the center if you want a glow. Skip an open flame.
The front of this feather gives you texture. The back is where the piece becomes worth saving.
Roll a flat slab and cut a feather shape using a paper template. Press a shallow center line down the length, followed by short diagonal marks on both sides.
Make a hanging hole with a straw before the clay firms. Once dry, paint the feather cream, sage, terracotta, or another shade from your table palette, then thread ribbon through the hole.
After dinner, let one person write a short sentence on the back and add the year. Do not fix a child’s uneven letters. Six Thanksgivings from now, that may be the detail everybody wants to see.
Real leaves do most of the decorative work here, which makes this a smart beginner project with a detailed finish.
Air dry clay leaves work so well in fall decor because the real leaf does the detailed part for you. If a clay leaf dish looks more advanced than your current skill level, use the same pressed-vein technique on flat hanging leaves and let the natural shape carry the detail.
Roll the clay into an even slab. Place a fresh maple, oak, birch, or another sturdy leaf vein-side down and roll lightly across it.
Peel the leaf away, cut around the outline, and make a hanging hole near the stem. Repeat with different leaf shapes so the finished garland does not look mechanically repeated.
Paint each piece in a related but different shade, such as rust, olive, mustard, cream, and brown. Write a family memory or short thankful note on the back, then string the leaves with space between them.
For another approachable stamped-clay method, this shows rolling, cutting, making hanging holes, stamping, drying, and sanding a personalized tag.
You can suggest Thanksgiving without sculpting another whole bird.
Cut five broad feather shapes from an even slab and mark the center veins. Overlap the lower ends into a circular arrangement, then blend those joins until the center feels sturdy.
Rest the whole piece inside a shallow bowl while the clay is still flexible. The support gives the feathers a gentle upward curve.
Once dry, paint the feathers in related fall tones. A lighter dry-brushed shade across the raised lines can make the carved texture easier to see.
Use the bowl for keys, wrapped candy, jewelry, or paper notes rather than food.
These are the easiest Thanksgiving clay projects for kids in the list because a cookie cutter handles the hardest part of the shape.
Roll the clay, cut small pumpkins, and press curved vertical lines into each one with a skewer. Add a short stem from a scrap of clay.
After drying, paint the pumpkins in slightly different orange-brown shades. On the reverse, write one prompt:
Put them in a basket and let everyone choose one before dinner. The piece has a job, which gives it a better chance of returning next year.
A tiny cream mug with a pumpkin tucked inside feels playful without needing a pile of extra details.
Form a small ball and press your thumb into the center. Pinch the walls until the thickness feels fairly even.
Roll a narrow clay rope for the handle. Roughen the joining points, attach both ends, and smooth them into the mug body.
Make a tiny pumpkin, mark shallow ribs with a toothpick, and place it inside the opening. Add a hanging hole before drying.
Paint the mug cream, sage, taupe, or muted blue and keep the pumpkin warmer so it becomes the focal point. One narrow stripe or a few dots is enough if the mug still looks bare.
Tiny pumpkins, carrots, corn, squash, and beets are a good use for clay scraps left after larger projects.
Keep the back of each vegetable fairly flat so there is enough surface area for the magnet. Add only the marks that make the shape readable, such as pumpkin ribs, corn kernels, or fine carrot lines.
Let the clay and paint dry completely before an adult attaches any magnet.
Health Canada warns that swallowing small powerful magnets can cause severe internal injuries and can be fatal. Keep loose magnets and finished pieces that could shed a magnet out of children’s reach, and seek immediate medical attention if magnet ingestion is suspected.
If young children live in or regularly visit the home, choose the clay vegetables without magnets and display them in a small bowl instead.
This is the project to choose if you want something calm, quick, and hard to ruin.
Roll small pieces into smooth ovals and press each one slightly flatter. Leave the edges rounded.
After drying, sand only the rough spots and paint the stones sandstone, ivory, cocoa, clay, taupe, or warm gray. Add one word to each:
Pile them in a bowl near the dining table. Each guest can choose a word and explain why it feels right, or simply take one home.
The cornucopia gives you a strong Thanksgiving shape without adding another turkey or flat pumpkin.
Shape loose foil into a tapered cone and wrap it with an even clay slab. Blend the seam, then curve the narrow end gently upward.
Press shallow woven lines into the exterior or leave it smooth if your decor leans simpler. When the shell is firm enough to hold itself, slide the foil out carefully so the inside can continue drying.
Make miniature apples, pears, pumpkins, corn, squash, and acorns separately. Paint the horn oatmeal, terracotta, or warm brown, then give each small piece its own softened harvest color.
Do not pack the opening until nothing can be identified. A little empty space makes the individual forms easier to see.
A Thanksgiving recipe can carry as much family history as the decorations.
Roll a slab and cut a rectangle, oval, arch, or softly irregular plaque. Decide on the wording before you stamp anything.
Short lines work best:
Press letter stamps into the soft clay or wait until the painted plaque is dry and add the words by hand. Make one or two hanging holes with a straw before drying.
A tiny wheat stem, spoon, pie slice, or leaf in one corner is enough decoration. If you want more ideas for painted finishes and color combinations, these pottery painting ideas can help you choose a direction without overcrowding the plaque.
This one earns the final spot because it changes after sunset.
During the day, it reads as a small clay house. At night, a battery light behind the cutout windows gives it a warm focal point on a mantel, sideboard, or shelf.
Roll enough slabs for the walls and roof, keeping them at a similar thickness. Cut a front, back, two side walls, and two roof pieces.
Cut the windows and doorway before assembly. Roughen the meeting edges, add a little moisture, and press the walls together. Support the corners while they firm.
Add the roof once the walls can hold themselves. Keep the doorway detail restrained with one small pumpkin, a few leaves, or a simple wreath.
Leave an opening at the back or underneath for a battery-operated tealight. Use only a flameless light inside.
Paint the house warm white, muted terracotta, sage, taupe, or another shade already present in your room. The glow through slightly imperfect handmade windows is the point, so do not sand every trace of the handwork away.
Cracks usually have more to do with drying, thickness, and weak joins than artistic skill.
A paper-thin edge attached to a thick solid center will not lose moisture at the same rate. Give flat pieces enough body to survive handling and avoid sudden changes in thickness when you can.
The top can feel dry while the underside still holds moisture. For pieces that can be safely moved without losing their shape, turn or reposition them later in the drying process so more surfaces meet the air.
A specialist explains how thickness, humidity, airflow, and contact with a mold can change drying time.
A damp fingertip can soften an edge or help smooth a seam. Saturating the clay can create a different problem.
Follow the instructions for the exact brand you are using, especially if you are tempted to speed drying with heat. Natural air drying is the safer default unless the manufacturer specifically gives another method.
If a hairline split appears while the clay is still workable, fresh clay mixed with a little water can sometimes fill the gap. For a weak structural join, rebuilding the connection is better than hiding it under paint.
Wait until the piece is dry all the way through. Crayola lists acrylic, tempera, and watercolor as paint options for its fully dried Air-Dry Clay.
For these Thanksgiving clay projects, acrylic paint is the easiest route to an opaque fall palette and small detail work.
| Look | Simple palette |
|---|---|
| Warm traditional | Rust + mustard + cocoa + cream |
| Natural | Olive + wheat + brown + clay |
| Soft neutral | Ivory + taupe + warm gray + muted rust |
| Cottage | Sage + cream + dusty terracotta + brown |
| Moody | Burgundy + deep brown + ochre + beige |
| Modern | Stone + cream + charcoal + one rust accent |
Repeat one or two colors across separate projects. The turkey, leaves, wagon, and cornucopia will begin to feel related even though their shapes are completely different.
On leaf veins, feather lines, acorn caps, and wagon planks, push a slightly darker shade into the recessed areas, then soften the surface with a nearly dry brush.
Do not cover every sign that the object started as clay. A little terracotta showing through a brown wash or a small finger mark on a family keepsake can make the piece feel more personal.
A compatible sealer can protect painted surfaces from ordinary handling, but it has limits.
Crayola recommends waiting until its Air-Dry Clay is completely dry before applying a compatible acrylic varnish, and it states that sealing does not make the clay waterproof. Finished pieces should stay indoors.
That means a sealed trinket dish is still a decorative catchall, not a cereal bowl, outdoor planter, or object that should sit in standing water.
A jagged cut edge can make a careful project look unfinished. Once the clay is fully dry, use fine sandpaper on rough edges and wipe away the dust before painting.
A wagon does not need every square inch filled with tiny produce. A plaque does not need leaves in all four corners. A mantel does not need every finished project displayed at once.
Mix small tokens and ornaments with one larger garland, bowl, plaque, or luminary. Fifteen objects all made at the same palm-sized scale can look more repetitive than they need to.
Wood bowls, linen napkins, cutting boards, books, baskets, pottery, and branches can support handmade fall decor without another shopping trip.
Drying time depends on the product, thickness, project size, airflow, and room conditions. Crayola says its Air-Dry Clay generally takes about 24 hours to become dry to the touch and about 72 hours to dry completely.
Yes, if the project matches their age and skill. Flat leaves, pumpkin tokens, blessing pebbles, and acorn stones avoid a lot of fiddly assembly, while adults should handle sharp blades, strong adhesives, loose magnets, and finishing products.
Yes. Paint only after the clay is completely dry and follow the instructions for the brand you used. Acrylic paint is a practical choice for the opaque fall colors in this article.
No. Crayola explicitly says sealing its Air-Dry Clay does not make it waterproof and recommends indoor display.
Do not assume a decorative clay dish is food-safe because it has paint or varnish on it. Sculpey does not recommend its clays or glazes for dishes intended for direct or indirect food contact. Use the pie dish and feather bowl for jewelry, keys, wrapped items, or decor instead.
Wrap it tightly and place it in an airtight container according to the storage guidance for your clay. Gathering Beauty recommends wrapping leftover air-dry clay and keeping it sealed in a cool, dark place so it retains moisture.
Choose the project with the smallest gap between “I like that” and “I can finish that.” For a first attempt, blessing pebbles, pumpkin tokens, or pressed leaves give you room to learn how your clay rolls, dries, sands, and takes paint before you build a wagon or house.
You do not need to finish all fifteen Thanksgiving clay projects before the holiday.
Choose one that has a reason to come back out next November. Maybe it is the recipe plaque because that dish is always on the table, the feather because someone wrote on the back, or the little house because everybody notices when the windows start glowing.
A slightly crooked stem will not matter much after a few years. The name, date, fingerprint, or memory attached to it probably will.
Pick one project, make it, and write the year somewhere on the back.
Explore original printables, find another story or save your next creative project.