
POPULAR AT FAMILY HAVEN
POPULAR AT FAMILY HAVEN
These Halloween clay wall art ideas start with small plaques, framed reliefs and seasonal shapes you can size and style for the wall you actually have.
Affiliate disclosure: This post contains Amazon.com product links. Family Haven Studio may earn a commission from qualifying purchases at no added cost to you.
You can spend an hour making a clay ghost you genuinely like, hold it against the wall, and suddenly realize it looks tiny, too bright, or oddly lonely in the room.
That is the part a lot of Halloween clay tutorials skip. Making the object is only half the job. The other half is making it belong in your home.
Good Halloween clay wall art starts with the wall, not the lump of clay. Look at the space first. Is it a narrow strip beside a door? A quiet section of a gallery wall? A wide area above a console? A reading nook that could handle something darker? Once you know the job the art needs to do, choosing the shape and style becomes much easier.
Use three questions as you work: Can I read the shape? Can I hang the weight? Does it belong on this wall?
If the answer stays yes, you are already avoiding the most common problem with seasonal DIY decor: adding more detail when the piece really needs better scale, stronger contrast, or less going on around it.
A little planning keeps you from finishing a lovely six-inch piece for a wall that needed something closer to sixteen inches. It also keeps you from adding a hanging hole after the clay has hardened and hoping nothing cracks.
Stand where you normally see the wall and look at the empty area from across the room. You are trying to judge the visual space, not the exact square inches.
| Wall situation | Better clay direction | Why it works |
|---|---|---|
| Narrow wall beside a doorway | Tall arch or vertical hanging | Uses height without crowding the passage |
| Small gallery-wall gap | Framed cameo or mini plaque | Adds texture without taking over the grouping |
| Wide wall above a console | Triptych or larger relief | Gives the wall enough visual weight |
| Reading nook | Moon, moth, cat, books, or Gothic motifs | Fits the quieter, moodier setting |
| Family room | Friendly ghosts, pumpkins, houses | Seasonal without feeling too severe |
| Neutral room | Cream, charcoal, brown, olive, muted rust | Lets Halloween join the room instead of fighting it |
If you are already working on the room itself, Family Haven Studio’s can help you judge wall art beside the rest of the furniture instead of treating the wall as a separate project.
Quick tip: Mark the proposed width and height on the wall with removable painter’s tape before shaping the clay. Walk across the room and look again. A size that feels huge in your hands can look surprisingly small above furniture.
For a first project, air-dry clay is usually the least complicated route because it hardens without oven curing. A white clay also gives you a neutral base for cream ghosts, black cats, muted pumpkins, and darker painted backgrounds.
One straightforward option is . The listing is for a five-pound resealable tub, which is useful if you plan to make a small series of plaques rather than one tiny piece.
Polymer clay makes more sense when you want smaller, sharper details and you are comfortable following the exact oven-curing directions on the package. For larger flat wall pieces, air-dry clay keeps the setup simpler.
Do not borrow one brand’s thickness or drying time and apply it to every clay. The product in your hand gets the final say. For example, Crayola’s says its Air-Dry Clay pieces should be at least 1/4 inch thick, while this rolls its specific product to a maximum 3/16 inch sheet. Those numbers are not interchangeable rules. They are proof that the package directions matter.
For a useful non-Halloween example of how separate air-dry pieces can be joined into one hanging, see this . It is a good visual reference for planning holes before drying and letting cord become part of the finished shape.
You do not need a drawer full of specialty tools to make the ideas in this guide.
Start with:
Nice to have:
Skip the giant starter kit if half of it solves problems you do not have yet.
It is much easier to edit a design when you know the mood you are aiming for.
| If you like… | Start with… | Easy palette |
|---|---|---|
| Spooky-cute | friendly ghosts, soft pumpkins, crooked houses | cream, charcoal, muted orange |
| Gothic | moths, dark arches, skeletal lines, old architecture | black, bone, burgundy, deep plum |
| Vintage Halloween | postage shapes, faded pumpkins, old-fashioned frames | rust, cream, brown, black |
| Cottage Halloween | mushrooms, botanicals, small houses | olive, cream, rust, brown |
| Celestial | moons, eyes, stars, moths | midnight blue, cream, plum |
| Minimal | one bold silhouette, little surface detail | black, cream, one accent |
If black cats, moons, Gothic windows, pumpkins, and old-style frames already suit your October decor, these give you another way to see how the same Halloween symbols can shift from funny to moody without changing the whole room.
Do not assume Halloween requires bright orange. Cream ghosts, charcoal bats, muddy rust, olive, brown, faded plum, and black can give you plenty of seasonal contrast.
Family Haven Studio’s can also help if you are trying to make the art sit comfortably beside a warm living-room palette.
Keep the clay piece lighter, use a frame when that makes sense, and choose a wall-hanging method that suits both the weight and the wall surface.
Do not guess at the holding capacity of removable strips, hooks, or adhesive products. Follow the maker’s restrictions for the exact product you use.
If you do not want to read fifteen ideas and still feel undecided, use this table first.
| Idea | Skill level | Best wall | Best reason to choose it |
|---|---|---|---|
| Framed ghost cameo | Beginner | Small gallery wall | Easiest polished result |
| Black cat moon arch | Beginner | Narrow wall | Strong shape with few details |
| Haunted rowhouse triptych | Intermediate | Wide wall | Best larger statement |
| Moon-and-moth medallion | Intermediate | Reading nook | Best Gothic-celestial choice |
| Pumpkin patch relief | Beginner/intermediate | Family room | Warm fall-to-Halloween look |
| Ghost-and-bat hanging | Beginner | Narrow vertical space | Best movable hanging |
| Vintage postage plaques | Beginner | Small grouping | Best project for using scraps |
| Skeleton butterfly plaque | Intermediate | Study or bedroom | Dark without obvious Halloween icons |
| Eyeball botanical plaque | Intermediate | Eclectic gallery wall | Strangest decorative option |
| Witch-boots relief | Beginner/intermediate | Mudroom or family space | Best playful story |
| Mushroom cottage plaque | Intermediate | Bedroom or nook | Softest cottage-style choice |
| Celestial eye tiles | Beginner | Hallway | Best clean modern set |
| Haunted bookshelf relief | Intermediate | Reading area | Best book-lover idea |
| Spiderweb texture plaques | Beginner | Minimal room | Least sculpting required |
| Halloween doorway relief | Intermediate | Entryway | Best depth and atmosphere |
My pick for a first attempt: the framed ghost cameo. The frame gives the finished piece more presence, protects the edges, and takes care of the actual wall hardware.
Skip for your first attempt: the rowhouse triptych and haunted doorway if you have never rolled a flat clay slab before. Both ask you to keep multiple lines, edges, and shallow relief details under control at the same time.
A ghost is easy to shape. Making it look like art instead of a leftover ornament is the more interesting part.
Roll a small oval or arched backing, then add one shallow ghost with a broad body and two tiny eyes. Keep the lower folds soft and simple. Once the piece is completely dry and finished, mount it inside a secondhand oval or rectangular frame.
Best for: entry tables, small gallery walls, bedrooms
Good size: roughly 5 to 8 inches for the clay portion, then let the frame add visual size
Palette: cream ghost, charcoal backing, dark wood or antique-looking frame
Why it works: the frame gives a simple shape enough authority to sit beside prints and photographs.
Watch for: making the ghost too small inside an ornate frame. Leave breathing room, but do not let the frame become the entire story.
Make it better: paint the backing a flat charcoal or deep plum and leave the ghost warm white instead of pure bright white. That slight softness makes the piece easier to place beside wood and warm neutrals.
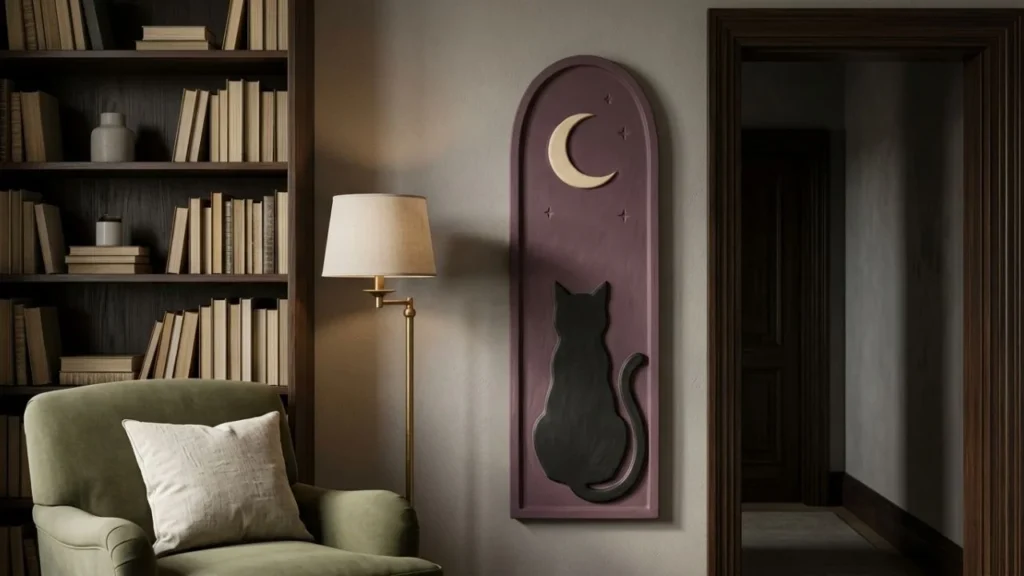
Cut a tall arched slab, place a seated black cat in low relief near the bottom, then add a crescent moon above it. One or three small stars are enough.
Best for: hallways, the strip beside a bookshelf, reading corners
Good size: about 6 to 9 inches wide and 10 to 14 inches tall
Palette: matte black, cream, dark plum, muted rust
The tall shape is doing most of the work here. It fits spaces where a square plaque would feel stubby and a large framed print would be too wide.
Keep the cat broad. Paint whiskers later instead of shaping thin clay whiskers that can break. If you want the cat to feel more old-world than cartoonish, give it a long curved tail and keep the face nearly featureless.
Worth knowing: a black cat silhouette already has strong contrast. Do not fill the entire arch with stars, vines, pumpkins, and lettering too.
Make three narrow plaques that form one crooked street when hung together. Each panel gets one house front with a roofline, door, and a few windows.
Best for: above a console, along a dining-room wall, larger entryways
Skill: intermediate
Palette: charcoal, faded cream, muted brick red, soft amber
The separation between the three panels gives you visual depth without asking one large slab to carry every detail. It also makes storage easier because three narrow pieces can be wrapped separately.
Keep the architecture shallow. Incised windows and low raised trim are safer than long thin chimneys or delicate roof spikes.
Try making only two windows look lit. If every window is bright yellow, the houses start looking more cheerful than haunted.
For an entryway that already has fall color, baskets, branches, or pumpkins, leave enough open wall around the triptych so it does not become one more seasonal object fighting for space.
Start with a round plaque. Place a broad moth across the lower half and a crescent moon above it. Press wing lines into the clay instead of building the wings from a stack of thin pieces.
Best for: bedrooms, studies, reading nooks
Skill: intermediate
Palette: midnight blue, cream, black, dusty plum
This is one of the best choices if you want Halloween atmosphere without a jack-o’-lantern, ghost, or witch hat. The round format also breaks up a gallery wall full of rectangles.
A matte finish works especially well because side light can reveal the raised wing pattern without glare washing it out.
Do not overdo: the moth wing pattern. From six feet away, you need to see moth first, tiny linework second.
Use a low rectangular plaque and build the scene in layers: one larger pumpkin in front, two or four smaller pumpkins behind it, a thin fence line, and a moon or bare hill in the distance.
Best for: kitchens, family rooms, fall-to-Halloween decorating
Skill: beginner to intermediate
Palette: muted orange, brown, cream, olive, charcoal
The useful trick is scale. A larger foreground pumpkin and smaller background pumpkins make a shallow relief feel deeper than it is.
Keep the pumpkin forms low rather than attaching round clay balls to a flat plaque. You want enough relief for shadow, not so much weight that the piece becomes awkward to hang.
If the kitchen is already carrying most of your fall decor, these are useful for keeping the seasonal pieces away from the work surfaces you use every day.
This is the best option for a tall strip of empty wall. Cut three to five separate pieces, add the holes while the clay is workable, then connect them with cord after everything is dry and finished.
Try a sequence such as moon, bat, ghost, pumpkin. Keep the pieces related in size so one heavy shape does not pull the hanging sideways.
Best for: narrow walls, beside a door, kids’ rooms, small apartments
Skill: beginner
Palette: cream, black, muted orange, dusty purple
This format also gives Halloween clay wall art a little movement. Leave enough cord between the pieces that they can hang freely without knocking into each other every time the door closes.
Quick tip: make the top piece the simplest shape. The eye naturally travels downward through the hanging, so the lower shapes can carry a little more detail.
Cut three or four small rectangles with softly scalloped or dotted borders. Give each plaque one large motif, such as a ghost profile, moon, black cat, or pumpkin.
Best for: small gallery walls, shelf-backed art, using leftover clay
Skill: beginner
Palette: faded cream, rust, black, dark brown
Repeat the same plaque size and border treatment, then change only the center image. Repetition keeps the set orderly even when the motifs differ.
Skip tiny faux postage text. It is hard to shape cleanly, hard to read from a wall, and not needed for the idea to read as vintage stamp-inspired art.
This is also a good family project because each person can make one plaque while the repeated border keeps the finished set related.
Shape a broad butterfly in shallow relief, then replace delicate wing markings with bone-like ribs and joint lines. Mount it on an oval or rectangular background.
Best for: Gothic bedrooms, offices, studies
Skill: intermediate
Palette: bone cream, charcoal, burgundy, brown
The idea reads as Halloween without relying on a literal skeleton figure. Keep the wing edges thick enough to handle normally and incise most of the bone detail instead of attaching thin clay strips.
A slim painted border gives the plaque an old specimen-card feeling without adding fake labels or unreadable writing.
Skip this if: you want soft, family-room Halloween. It works better in a darker, quieter setting where the oddness feels intentional.
Start with an oval plaque and one oversized eye at the center. Surround it with leaves, berries, and two or three flower shapes. Keep the eye smooth and let the foliage carry most of the texture.
Best for: eclectic gallery walls, botanical rooms, bedrooms
Skill: intermediate
Palette: deep green, cream, black, rust, plum
The piece works because it sits between pretty and strange. If every leaf, berry, petal, eyelash, and iris line gets equal detail, that balance disappears.
Make the pupil and iris large enough to read from a few steps back. Use smaller leaves near the outer edge so the eye stays dominant.
Make it calmer: swap bright green for olive and bright purple for muddy plum.
Make a rectangular relief showing the bottom edge of a curtain, striped stockings, and crooked boots. The unseen character is the joke.
Best for: mudrooms, laundry rooms, family spaces
Skill: beginner to intermediate
Palette: black, cream, muted purple, rust
Press the curtain folds into the base rather than stacking thick strips of clay. Build the boots just high enough to throw a small side shadow.
This idea is stronger when you resist adding a broom, cauldron, hat, cat, sign, and spiderweb around it. The missing witch is what gives the piece personality.
Use an arched base with a crooked mushroom house, one tiny door, one warm-looking window, a path, and a crescent moon.
Best for: cottage-style rooms, bedrooms, reading nooks
Skill: intermediate
Palette: forest green, cream, rust, brown, muted red
Keep the mushroom cap shallow and build the glow with paint rather than actual lighting. A warm cream center with darker color around the window can suggest light without adding another component.
A few grass lines and dots are enough for the setting. If the background becomes a full miniature forest, the little house loses its place as the focal point.
Make three narrow plaques with one symbol on each: a crescent moon, a simple eye, and an eight-point star. Repeat the same background, border, and size.
Best for: hallways, bedrooms, modern Halloween decor
Skill: beginner
Palette: deep plum, cream, black, muted orange
This set works especially well when the rest of the home is fairly modern. The symbols feel seasonal, but the repeated geometry keeps the group from looking like a collection of novelty signs.
Hang them in a horizontal row on a wider wall or stack them vertically in a narrow passage.
Best budget move: use one clay slab for all three so the thickness matches, and mix one background color for the whole set.
Shape a small rectangular plaque with three or four book spines, a candle, a tiny ghost peeking between the books, and one light cobweb in a top corner.
Best for: bookcases, home offices, reading chairs
Skill: intermediate
Palette: aged cream, brown, black, deep red, muted green
Score the book-spine lines into the base rather than stacking a pile of separate clay rectangles. It keeps the weight down and makes the surface easier to paint.
Leave the spines blank. Tiny book titles are not doing anything useful from across the room.
If you are building the wall around a chair or bookcase rather than decorating an existing one, these can help with the space around the art too.
This is the easiest option if sculpting figures makes you hesitate. Roll one or three plain shapes, press a web-like texture into the surface, remove the texture material, then cut the final outline.
Best for: minimal rooms, modern entryways, small seasonal swaps
Skill: beginner
Palette: charcoal, deep plum, cream, rust
Test the texture material on a scrap first. You want an impression, not fibers stuck in the clay.
Once dry, paint the surface one color and use a nearly dry brush with a lighter color across the high points. Stop before every line becomes equally bright.
Best beginner choice if you hate sculpting: this one. The surface pattern does the visual work.
Make one larger arched plaque and score a doorway inside it. Add floor lines that narrow toward the back, one small ghost in the distance, and a pumpkin near the front edge.
Best for: entryways, hallways, larger seasonal walls
Skill: intermediate
Palette: charcoal, cream, dark brown, muted orange
The doorway becomes a frame inside the clay, so the viewer’s eye moves inward. That gives the scene depth without requiring thick layers.
Keep the distant ghost smaller than feels natural while you are shaping it. Forced perspective depends on that size difference.
This is the idea I would choose for a larger entryway wall because it has enough presence to stand alone. If your entry already has baskets, a mirror, a bench, or fall branches, use the before adding more seasonal pieces around it.
Handmade does not mean every edge needs to be ruler-straight. It does mean the irregular parts should feel like they belong there.
From across the room, you should be able to name the main shape quickly: ghost, cat, moth, doorway, eye, house.
If the supporting details become the first thing you notice, edit something out.
Two main colors plus one accent is enough for most of these ideas.
Try:
The color you leave out can matter as much as the one you add.
Shallow relief looks best with some side light. A moth wing, pressed spiderweb, book spine, or raised ghost fold becomes easier to see when the light makes a soft shadow beside it.
If every inch is deeply textured, those shadows start competing.
A five-inch clay plaque can disappear on a large wall. You have three good options:
Do not surround a too-small piece with random filler just to make the wall look fuller.
This is where patience earns its keep. A wall piece that feels dry on the surface may still need more time before paint or finish goes on.
Follow the drying directions for your own clay. For Crayola Air-Dry Clay specifically, the company’s drying guidance says about 24 hours to feel dry to the touch and about 72 hours to dry completely, with the piece size and room conditions affecting the timing. Another clay can behave differently.
If cracking has been your recurring problem, this gives a useful plain-language explanation of even drying, joining pieces, and handling the clay while it sets.
Acrylic paint is an easy choice for indoor decorative pieces because it gives opaque color and is easy to mix into softer Halloween shades. The exact surface prep can vary by clay and finish, so test on a scrap when you are unsure.
A set such as gives you enough colors to mix rust, cream, olive, plum, charcoal, and muted orange without buying a separate bottle for every plaque.
For a broader look at paint types and thin-coat application, this is a useful follow-up.
Quick tip: If you spent time pressing fine texture into the clay, use thinner paint layers around that area. Thick paint can soften the detail you worked to create.
A clear finish can change the sheen and add surface protection, but it does not turn every air-dry clay piece into outdoor decor. Crayola’s sealing guidance says its Air-Dry Clay can be varnished after it is fully dry, but sealing does not make that clay waterproof.
If you want a reader-friendly comparison of matte, satin, gloss, and other finishing options, this explains how the finish changes the look as well as the protection.
If a clear spray finish suits your materials and desired sheen, is one verified Amazon.com USA option. The linked product dries glossy, so skip it if the whole point of your piece is a chalky matte surface.
That last part matters. A product can be good and still be wrong for the look you are making.
The wall arrangement needs as much editing as the clay.
Use one larger doorway relief, rowhouse group, or medallion above a small console or bench. Leave some empty wall around it.
Repeat one thing, not everything. Three pieces might share cream backgrounds but use different shapes, or share black frames but use different motifs.
Clay adds depth beside flat prints and photographs. Use that contrast on purpose. One or two clay pieces may be enough.
If the clay piece is joining an existing gallery wall, use the frames and spacing that are already working there instead of rebuilding the whole arrangement around one seasonal piece.
Instead of squeezing Halloween decor into every open inch, temporarily remove one everyday print and put the clay piece in its place. Your wall keeps its spacing, and you do not create a storage problem with five new frames.
Seasonal decor has to survive eleven months of not being seasonal.
Before packing it away:
Frames are useful here too. A framed relief has protected edges and is easier to stack vertically with other framed seasonal art.
| Problem | What is probably happening | Better move |
|---|---|---|
| The plaque looks tiny on the wall | Scale was judged on the table | Tape the size on the wall before making the next one |
| The piece feels visually messy | Too much going on in the motifs or colors | Pick one focal shape and remove one or two supporting details |
| Edges keep chipping | Thin projections are taking the hits | Use broader shapes or let a frame protect the edge |
| The clay is cracking | Drying, water, thickness, or joins may be contributing | Check the exact clay directions and slow down the process |
| Texture disappeared after painting | Paint went on too heavily | Use thinner coats around fine relief |
| The hanging feels crooked | Shapes have uneven weight | Rebalance the order or use a rigid backing |
| It looks too childish for the room | Color and facial detail are too playful | Reduce the palette and simplify expressions |
| It looks too dark | Every element has similar value | Add cream, bone, or a muted warm accent |
Start with a framed ghost cameo, spiderweb texture plaque, vintage postage plaque, or black cat moon arch. Each relies on one strong shape and does not need a lot of small attached parts.
The framed ghost is my first choice because the frame solves both scale and hanging.
Air-dry clay is easier when you want a no-oven project and a larger flat decorative piece. Polymer clay suits smaller details when you are happy to follow oven-curing directions.
For either one, follow the instructions for the exact product instead of treating every clay the same.
There is no useful one-number answer for every product. Different clay makers give different guidance. Use the recommended thickness for the clay you bought and keep the slab as even as you reasonably can.
Start by checking the directions for your clay. Too much water, uneven thickness, weak joins, and uneven drying can all contribute depending on the material and shape.
Do not try five internet fixes at once. Change one part of the process so you can tell what helped.
Some hardened clays can be drilled under the right conditions, but a small seasonal plaque is usually easier to plan with holes while the clay is still workable. That removes one extra chance of chipping an edge later.
Acrylic paint is a practical choice for indoor decorative pieces, but let the clay dry fully first and check compatibility with your specific material.
Thin coats help preserve pressed details and shallow relief.
It depends on the clay, paint, desired sheen, and how the piece will be handled. A compatible clear finish can protect the surface, but it can also make a matte piece glossy or alter the color slightly.
Test first when the look matters.
Do not assume so. A clear finish does not automatically make an air-dry clay piece weatherproof.
If you want outdoor Halloween decor, choose a material and finish system specifically intended for outdoor exposure.
Use fewer colors, make the main silhouette readable, keep the thickness consistent, protect fragile edges, and match the piece to the scale of the wall. A frame can also make a small relief feel more substantial.
The expensive-looking part is usually editing, not adding more decoration.
The difference between a Halloween project you enjoy making and Halloween clay wall art you are happy to bring out next year often comes down to decisions made before the clay dries.
Pick the wall. Pick the mood. Choose one focal shape. Keep the size honest. Plan the hanging method early. Then stop adding details when the piece already says what it needs to say.
You do not need to make all fifteen ideas. Choose the one you can already picture in your home, tape its rough size on the wall tonight, and let that first decision make the rest easier.
Save this guide before you start your first piece so the sizing, material, and hanging notes are easy to find.
For your next project, explore our clay craft ideas. To plan a place for the finished piece, browse our wall and lighting ideas.
Explore original printables, find another story or save your next creative project.