


A 2027 Printable Coloring Calendar doesn’t have to be a row of dates with a tiny flower in the corner.
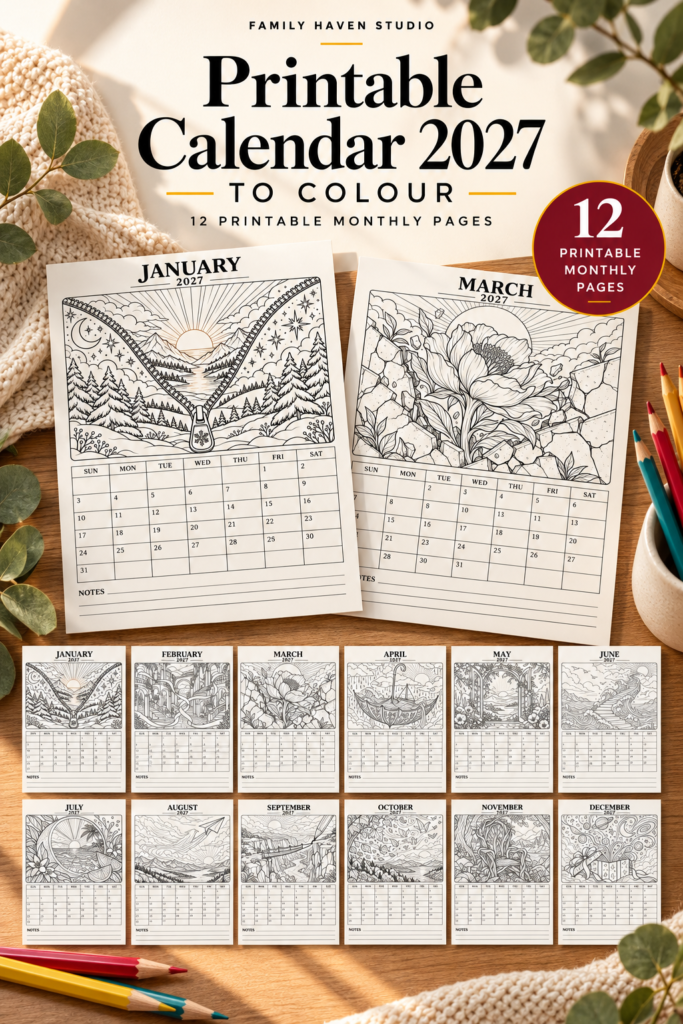
In this one, January’s snowy mountains unzip to reveal the sun, June’s ocean waves climb a staircase, and December’s gift box sends planets tumbling into the sky.
You still get an actual calendar beneath every drawing, ready for the birthdays, appointments, and ordinary Tuesdays that make up a year.
There are 12 black-and-white monthly pages in one PDF. Colour one at a time, hang the current month where you’ll see it, and save the finished pages if you like. You can plan your year and enjoy a fresh picture without starting a whole new project every weekend.
Ready to start? Use the calendar download on this page, print the month you want, and come back for a colour idea if the blank spaces are staring you down.
You get twelve monthly calendar colouring pages, each with its own scene across the top, a dated grid below, and a few lines for notes. January 1, 2027 falls on a Friday. The week runs Sunday through Saturday, and the pages don’t have prefilled holiday labels. That leaves you room to mark dates that matter in your own home.
This isn’t a pack of separate clipart pieces or a fill-in calendar where you type over the dates. It’s a printable colouring calendar with the dates already in place.
Someone who likes detailed adult colouring pages will have plenty to work with. There are little leaves, waves, stars, stones, ribbons and branches tucked into the drawings. Teens and older children may enjoy them too, especially if they like art that isn’t all cute animals and cartoon faces.
You don’t have to be good at drawing. You’re adding the colours, not sketching the stairs in the ocean yourself. That’s a relief, because those stairs look difficult enough to climb.
Don’t feel you have to begin with January. Pick the one that looks fun today. Here’s a quick way to choose.
| If you’re in the mood for… | Try this month | Your first move |
|---|---|---|
| Soft flowers and calm colours | May | Colour the flowers near the window before the distant hills |
| Strong contrast | January | Give the two sides of the zipper different skies |
| Bright summer colour | July | Start with the citrus slice in orange or pink |
| Simple colour blending practice | June | Shade one large wave from deep blue to pale aqua |
| A quiet, detailed session | November | Work on the wooden chair one branch at a time |
| Something wonderfully unexpected | December | Colour the biggest planet first, then build the sky around it |
The best part of this 2027 Printable Coloring Calendar is that you don’t need to treat each month the same way. One page is good for playing with light. Another is for tiny details. Another looks better with a loud, sunny palette. Here are twelve ways to make the original drawings your own.
A zipper opens the middle of a snowy mountain scene. The sun shines beyond it, while fir trees, crescent moons and stars fill the two sides. It feels as though somebody forgot to tell winter and summer they weren’t supposed to share a room.
Try a split-day colour scheme. Keep one side in navy, ice blue and silver. On the other, bring in peach, pale gold and warm pink. Colour the zipper a third colour, such as copper, so it feels like the line between two different skies.
Little trick: Leave some snow white. You don’t have to colour every bit of paper to show that it’s cold.
This is a good page for the first days of January, when you’re sorting out plans and deciding what deserves space on the calendar. Add the dates you know first. The rest of the month can fill in as life happens.
February takes you into a courtyard filled with sweeping stairs, stone arches, hanging plants and ribbons that twist through the middle. It’s romantic without asking you to colour another heart-shaped box of chocolates.
Try a faded-palace palette. Use warm stone for the steps, dusty lilac for the shadows and soft green for the leaves. Then make just one ribbon a bright colour. You’ll have a clear place for your eye to land even with all those small lines.
A lovely way to use this page is to mark a few dates for people you want to spend time with. Not every get-together needs an occasion. A shared lunch counts.
If you only have ten minutes: Colour one staircase or one cluster of leaves. Leave the rest for another day. A page that takes a month to finish still counts as finished.
A big flower pushes up between cracked rocks beneath a bright sun. The contrast makes this page interesting before you add a single colour: soft petals beside hard stone.
Let the flower do the talking. Use orchid, coral or magenta on the petals, then hold back on the rocks with pale grey and sandy brown. If both the flower and the stones are equally bright, they compete for attention.
For more depth, try two tones on one petal. Start lightly at the tip and add a darker shade close to the centre. Repeat on a few petals before doing them all. It helps you see what works without committing the whole flower.
This page fits a spring reset. Use the notes lines for one thing you want to begin or return to this month. A new book? A garden job? Twenty quiet minutes with coloured pencils? They’re all welcome.
April gives an upside-down umbrella a new job: sailing through rolling waves. There are falling raindrops, birds, a little sailboat and sunshine overhead. Whoever packed for this trip clearly forgot the part about staying dry.
Colour it as a sunny shower. Try bright yellow around the sun, lagoon blue in the waves and coral across the umbrella’s floral panels. The raindrops can stay pale blue, so the picture feels lively rather than gloomy.
Need an activity for a rainy afternoon? Let two people colour opposite ends of the umbrella. Agree on just three main colours, then see how different their choices look. It’s an easy shared project that doesn’t require everyone to work at the same speed.
Try this on the calendar: Write down one indoor idea for a day when the weather changes your plans. Having a backup is useful, especially when April starts making promises the forecast doesn’t keep.
Two open window panels sit among flowers and branches. Beyond them are distant mountains, trees and a winding view. There’s a lot to colour, but the window gives you a natural order: near first, far later.
Make the front look closer. Colour the flowers around the window in pink, apricot and leaf green. Use much softer shades for the distant hills. That small change makes the view look deeper without any special art tools.
If you’re not sure where to begin, pick one blossom near the bottom corner and match the other flowers to it. Don’t give every petal a new colour. A repeated palette keeps a busy page easy to look at.
May would make a lovely desk display, especially where you can’t see much greenery from the actual window. It’s the sort of scene that earns a second look while you check the date.
June’s staircase rises through waves toward the sun, with birds and mountains in the distance. The sea curls around the steps as if it intends to climb too.
This is the wave-blending month. Start with deep cobalt near the lower edges of a wave, layer turquoise over the middle and keep the foamy tips very light. Don’t press too hard on the first layer. You can always add more colour; asking a dark blue patch to become pale blue again is a harder conversation.
If blending feels new, the step-by-step guide to blending coloured pencils gently explains how to build colour with overlapping light layers.
The page also makes a fun countdown for summer plans. Put a small circle around the day you’re looking forward to. Let the dramatic picture stay above the practical details. That’s the nice thing about a calendar: the dates still have a job to do.
A giant citrus slice frames a tropical scene with palms, sea and sunlight. Smaller wedges, flowers and splash shapes fill the rest of the picture. This page has no intention of being shy.
Go bright on purpose. Try tangerine, hot pink, lime and teal. Keep the fruit frame bold, but give the ocean a calmer blue so the smaller scene inside the slice doesn’t disappear.
Here’s an easy colour test: choose one wedge and shade it from yellow at the centre to orange near the rind. If you like the result, use the same idea on the other sections. If not, you’ve only changed one little piece.
July works especially well as a holiday or weekend activity calendar. Mark your plans in pen or pencil before you start decorating the date boxes. You want to be able to find Saturday’s picnic without turning the page sideways and squinting.
A broad bird-like shape sweeps across the clouds beside a paper airplane. Underneath are mountains, forest and a winding river. There’s movement above and a much quieter world below.
Give this page a postcard look. Use faded denim blue, honey yellow, warm sand and rose. Colour the mountain shapes in lighter tones as they get farther away. Save the richest colours for the bird-like form and the lower foreground.
August is a good time to save a little space in the notes section for places you’ve been, places you’re going, or places you simply want to remember. It doesn’t have to be a big trip. A new park on the other side of town counts.
Don’t cover the whole sky. A few white clouds give the scene room to breathe. Sometimes the most useful colour is the one you leave out.
A narrow bridge stretches across a rocky canyon above a winding river. A giant pencil points into the scene from the right. It’s a strange mix, but it feels right for the month when notebooks and fresh schedules make a comeback.
Use the pencil as your main colour accent. Keep the cliffs in terracotta and sandy grey. Colour the river a soft blue. Then choose one brighter tone for the pencil so it doesn’t vanish among the stones.
For a student, this page can hold school dates, assignments and club meetings. At home, you can use it for school reminders while a separate daily routine chart for kids handles the repeated morning and evening steps. A monthly calendar and a routine chart do different jobs, and neither needs to pretend to do everything.
Try a useful notes prompt: What’s one thing you want to learn before December? Write it down, then pick a first date to start.
Leaves swirl across a sky filled with little folded paper birds. Below, evergreens and distant mountains border a lake. It’s an autumn picture without a single carved pumpkin demanding attention.
Make the movement visible. Use burnt orange, plum and moss green on the leaves, but colour the paper birds in muted aqua. Repeat that aqua in a small part of the lake. The two spots help the eye travel across the picture.
If you like working on leaves, the autumn leaf colouring page offers a separate, simpler place to practise shading before returning to October’s tiny shapes.
For a family activity, each person could choose one group of leaves. Keep the colour choices limited to four or five shades so the picture still feels connected once everyone’s finished.
Leave the swirling lines pale. Dark outlines already give them movement. Heavy colour on every curl can make the sky feel crowded.
November shows a chair made from twisting branches and roots, surrounded by mushrooms, leaves and trees. It looks as if the forest decided to make its own sitting room. The furniture wouldn’t be easy to move, but nobody seems to mind.
Work with texture instead of lots of colours. Choose three browns: a light one for the broad pieces of wood, a medium one for curves and a dark one for the gaps. Add moss green around the roots and soft grey on the stones.
This is a page for working slowly. Pick one branch, follow it from beginning to end, then stop if you’re ready. Trying to colour every line in one sitting can turn a quiet activity into homework.
If the woodland mood appeals to you, these enchanted autumn fairy illustrations offer another way to enjoy mushrooms, tiny forest scenes and story-inspired artwork, although they’re a separate collection, not extra pages in this calendar.
Use November’s notes for what you actually need to remember. A list of upcoming dates will probably help more than trying to write your life story in six little lines.
December’s open gift box sends planets, stars, galaxies and ribbons curling into the sky. The surprise inside seems a little larger than the wrapping paper planned for.
Start with the biggest shapes. Colour the largest planet purple, the gift box a deep blue, and the ribbons pink or silver. Then build the sky around them. Save the tiny stars until the end so they stay easy to spot.
You can make this a holiday page, but you don’t have to. A purple-and-turquoise space scene would look just as good in a month with no decorations in sight.
If you’re using the calendar for end-of-year plans, keep gift dates, get-togethers and appointments inside the boxes, not across the artwork. For a small home where you like changing the look with the season, these small apartment Christmas ideas include ways to swap in a seasonal print without filling another shelf.
One lovely finishing touch: Write down one thing you want to remember about 2027. It doesn’t need to be impressive. The small moments count too.
The 2027 Printable Coloring Calendar has lots of small spaces. That’s part of its charm, but you don’t need to fill every tiny leaf before lunch. Begin with the big shapes. The rest can happen another day.
Spread out a few pencils that feel good together, not the whole box. Try one dark shade, one middle shade, one light shade and one surprise colour. Test them on scrap paper. If they look muddy together, swap one out before working on the real page.
Colour the sky, ocean, rocks or large petals first. Then work into vines, stars, leaves and little decorative lines. Keep a sharper pencil for the smallest areas. If your hand gets tired, stop. The calendar isn’t going anywhere.
Want a completely different look? Print two copies of the same month if your download terms allow it. Colour one January scene as a cold blue night and another as a soft pink sunrise. You haven’t changed the picture; you’ve changed the feeling.
Try a lighter touch and shorter strokes. Turn the paper so your hand can reach the shape more easily. Don’t colour over a printed date just to make the page match. Empty space is allowed.
Quick reminder: You can leave parts of a picture unfinished and still use the calendar every day. There is no colouring police.
The pages are laid out for US Letter paper, 8.5 × 11 inches. Each one contains the month’s picture, dated boxes and notes section. Here’s the simple route from PDF to paper.
The PDF isn’t a fillable computer calendar. Write your plans into the printed boxes once you’re happy with the page.
Regular white printer paper is fine for a first coloured-pencil try. If you want the sheet to feel firmer on a clipboard or in a binder, use slightly heavier paper that your printer can accept. There isn’t one paper that suits every pencil and marker. This guide to colouring paper explains the trade-offs in simple terms.
If you’re using felt-tip or alcohol markers, put scrap paper beneath the page to protect the table. Ink can still pass through the calendar sheet itself, so test first. A protective sheet saves the surface underneath; it can’t make thin paper behave like special marker paper.
Write in the plans before colouring the smaller date boxes. Dark writing on a white box is easiest to spot quickly. If you want colour in the grid, shade only the top corner or mark one small symbol beside a date.
For example, a little orange dot could mean a birthday and a blue one could mean an appointment. Write your own tiny key in the notes area if that helps. Keep it simple enough to understand in November, when you’ve forgotten why you chose a purple triangle in March.
Stop after the test print. Check that Fit is selected and that the page orientation is portrait. Some home printers can’t print right to the edge. A little white border is better than losing Saturday or the notes section.
Let the printed page dry before adding wet colour. Try your pen on a spare print. If the outline smears, switch to coloured pencils for that copy. If a marker bleeds through, put a clean sheet underneath and consider another paper type for the next print.
A 2027 Printable Coloring Calendar can be useful long after the last pencil goes back in the drawer. You don’t need an elaborate setup. Start with one of these ideas and make it fit your own space.
Clip the sheet to a clipboard or a simple display board where you can see the dates. Put it somewhere you’ll actually look. Above a desk works better than behind a door that stays open all day.
For a little more help arranging personal art, these affordable wall decor ideas show how one meaningful picture can look better than a wall crowded with small things.
Use the first few days to mark appointments. Colour one part of the scene each weekend. By the end of the month, your page holds both a picture and a record of the days you lived through. Some months you may finish early. Some months December will arrive while November’s branches are still waiting. That’s fine.
Once a month ends, put the page behind the others in a folder. By the end of the year, you’ll have twelve pictures, plus whatever dates or notes you wrote along the way. If you want, slip in a photo or short note for each month. It becomes a small record of your year, not just used paper.
Colour the pages, mark the birthdays you know, and arrange them in order. Give them with a simple clipboard or binding that keeps the calendar boxes clear. Avoid punching holes through the picture or the first row of dates.
For more ideas on organising pages into something usable, this article on making your own planner shows different approaches to putting a personal planning system together.
Choose one day each month to colour with someone else. You might tackle different parts of the same page or print separate copies, subject to the download’s permitted uses. It can be an easy afternoon activity for teens, older children and adults. No need to set a deadline or compare who stayed inside the lines.