


POPULAR AT FAMILY HAVEN
POPULAR AT FAMILY HAVEN
You know that innocent little Christmas shopping trip where you only need ribbon?
Then somehow you are standing in the seasonal aisle holding a wreath, three decorative trees, a bag of bells, and a receipt that looks like you accidentally bought part of the store.
That is exactly why I like DIY Christmas decorations for adults that use simple materials but still look like something you would happily display.
You do not need to remake your whole house by hand. Pick the projects that fit your rooms, repeat a few colors and materials, and let the best pieces do the talking.
Every idea below is designed to stay below $100 for a single project. Many can cost much less when you already own basics such as scissors, glue, ribbon, paint, jars, old frames, or leftover decorations.
If you are short on time, this is the cheat sheet.
| If you want… | Start with… | Skill level | Hands-on time* |
|---|---|---|---|
| The easiest project | Oversized door bow | Very easy | 15 to 25 min |
| Almost no shopping | Paper stars | Very easy | 30 to 45 min |
| Something for the mantel | Orange ribbon garland | Easy | 30 to 45 min |
| A front-door statement | Evergreen hoop wreath | Easy | 30 to 60 min |
| Something reusable | Clay botanical ornaments | Easy | 30 to 45 min |
| Table decor | Greenery candle centerpiece | Very easy | 20 to 30 min |
| A thrift-store makeover | Framed Christmas art | Very easy | 20 to 40 min |
| A larger focal point | Cardboard Christmas village | Easy | 60 to 90 min |
*Hands-on estimates do not include drying time.
If you have $100 total for several projects, do not shop for all 15. Choose four or five ideas that use the same ribbon, greenery, paint, wire, paper, or clay.
That is how you stretch the budget without ending up with a drawer full of half-used supplies.
Before buying anything, shop your own house.
I mean it.
Check the Christmas bins, junk drawer, recycling, sewing box, garage, and that mysterious cupboard where ribbons go to retire.
Look for:
For bigger projects, I also like checking thrift stores before buying a new base. An ugly frame with good bones is still a good frame.
If you enjoy turning secondhand finds into decor, these thrift flip decor ideas will give you plenty more places to go with that idea.
Four supplies can carry half this article:
If you need them, these Amazon USA searches make it easier to compare sizes instead of hunting around store by store: wide wired Christmas ribbon and green floral wire rolls.
You do not need both links to make these projects. They are simply convenient options if those supplies are missing from your box.
This little step saves money because it stops random shopping.
Pick:
Two main colors + one supporting finish.
For example:
Then repeat those colors throughout your DIYs.
A £5 or $5 decoration can look far more thought-out when it belongs to the same visual family as everything around it.
Designer advice on polished Christmas decorating ideas follows the same basic idea: controlled color, mixed texture, ribbon, greenery, warm light, and a little restraint can make inexpensive seasonal decor feel much richer. Homes and Gardens
And yes, restraint includes knowing when to put the glue gun down.
Sometimes the project is finished. It does not need one more bell.
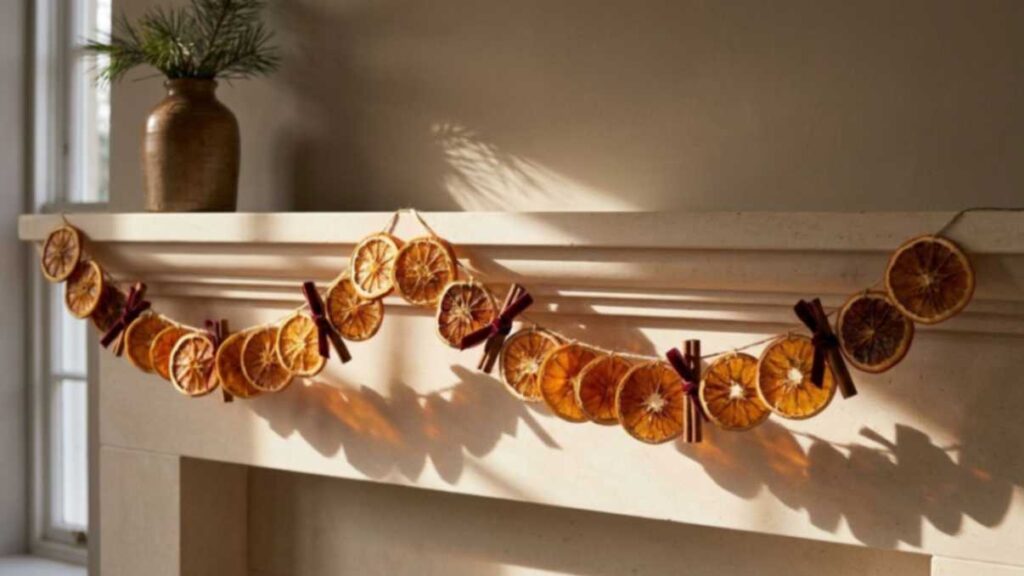
This is one of my favorite places to start because it looks beautiful on a mantel without asking much from you.
The oranges bring color and texture. Velvet ribbon is the tiny upgrade that stops it feeling too rustic if rustic is not your thing.
Best for: mantel, window, mirror, staircase
Difficulty: easy
Budget: low
Hands-on time: about 30 to 45 minutes, plus drying
Dry thin orange slices until there is no damp center left.
Once they are fully cool, thread them onto twine or ribbon. Leave a little space between slices rather than packing them together.
Tie small bows between a few oranges.
You can also add cinnamon sticks, but keep it simple. The oranges are already doing most of the work.
The Spruce has a useful dried orange garland tutorial with more drying, stringing, and storage details if this is your first time working with dried citrus. The Spruce
Use ribbon already appearing elsewhere in the room.
If the tree has burgundy velvet, use burgundy here.
That one repeat makes separate decorations look like they planned to meet each other.
For more ideas around the fireplace and seating area, these cozy Christmas living room ideas fit naturally with this project.
If a giant full wreath feels like too much greenery, this gives you the Christmas look with far less material.
The empty space is part of the design.
Best for: front door, interior door, kitchen, wall
Difficulty: easy
Budget: low to moderate
Hands-on time: about 30 to 45 minutes
Attach greenery to the lower third or lower half of the hoop.
Do not force every branch into the circle. Let a few pieces extend beyond the edge.
Cover the wire connection with one bow.
Then stop.
That last instruction may save you from adding six ornaments, berries, bells, glitter leaves, and a tiny wooden sign that says JOY.
If you want a fuller wreath later, Martha Stewart has a collection of long-lasting Christmas DIY ideas that includes wreaths, paper decorations, garlands, and pieces designed to return year after year. Martha Stewart
Your finished hoop would also work well with these Christmas entryway decor ideas if you want to carry the look beyond the door.
This may be the easiest high-impact project on the entire list.
One large bow can give you more visual payoff than a basket full of tiny decorations.
Best for: front door, mirror, tree, wreath, staircase
Difficulty: very easy
Budget: low
Hands-on time: 15 to 25 minutes
Create two generous loops.
Pinch them tightly in the center and secure with floral wire.
Add two long ribbon tails and cut the ends neatly.
Do not trim too much before you hang it. A bow often needs longer tails once you see it against a full-size door.
Go bigger than your first instinct.
A tiny bow on a large front door tends to disappear.
If you are decorating a porch, HGTV’s oversized Christmas porch DIYs are a great example of how scale can make budget materials feel intentional. HGTV
These are the project I would choose if you want something you can unwrap again next Christmas.
They are simple, quiet, and easy to match to almost any tree.
Best for: tree, gift toppers, small garland
Difficulty: beginner-friendly
Budget: low
Hands-on time: 30 to 45 minutes, plus drying
If you need clay, this white air dry clay search on Amazon USA is an easy place to compare pack sizes.
Roll the clay evenly.
Press a small piece of greenery into the surface, then lift it away carefully.
Cut your ornament shape.
Use a straw to make the ribbon hole before the clay dries.
Leave the pieces flat until completely hard.
Martha Stewart’s editors use the same botanical-imprint idea in their botanical ornament tutorial and recommend keeping the pieces flat while they dry to reduce warping. Martha Stewart
Leave them white for a soft look, or paint only the edge.
Gold edge + cream ribbon is lovely.
Black edge + velvet ribbon looks completely different.
If you discover that clay is your thing, these air dry clay wall hooks give you another project after Christmas.
These are especially pretty when you want something lighter than another round ornament.
Best for: tree, window, cabinet knobs, branch display
Difficulty: easy
Budget: low
Hands-on time: 20 to 30 minutes each
Create six wire arms from one central point.
Slide beads onto each arm.
Leave enough wire at the end to bend back so the beads cannot slip off.
Make several instead of one.
A single snowflake can look a little lost in a window. Three at staggered heights suddenly look like you meant business.
If your budget is whispering “please behave,” paper is your friend.
You can make a big visual moment from a few sheets.
Best for: window, wall, dining area, above a console
Difficulty: easy
Budget: very low
Hands-on time: 30 to 45 minutes
Use a restrained palette:
Then make several sizes.
Hang them as a group rather than sprinkling individual stars around the house like they are trying to escape.
The Spruce has a lovely roundup of paper Christmas decoration ideas including stars, ornaments, trees, garlands, and folded paper pieces. The Spruce
That shipping box does not know it yet, but it has plans for December.
This is one of the best DIY Christmas decorations for adults if you want a larger display without buying a row of ceramic houses.
Best for: mantel, shelf, console, windowsill
Difficulty: easy
Budget: very low
Hands-on time: 60 to 90 minutes
Draw simple house fronts in several heights.
Cut them out.
Add doors, windows, roof lines, and little details with a white marker.
Stand the houses in a row and place battery lights behind them.
Do not make every house the same.
Try:
one narrow townhouse
one little cottage
one shopfront
one tall house
one tiny church-style silhouette
Now it feels like a village instead of a housing development with a very strict homeowners’ association.
Seasonal wall art is one of the easiest things to overspend on because you only look at it for part of the year.
A reusable frame solves that.
Best for: entryway, hallway, kitchen, bedroom, shelf
Difficulty: very easy
Budget: very low
Hands-on time: 20 to 40 minutes
Clean the frame.
Paint it only if the finish really fights with your room.
Then replace the existing picture with:
After the holidays, change the art and keep the frame.
That is much kinder to the budget than storing 14 different seasonal signs.
You can borrow more ideas from these affordable wall decor ideas when you want the frame to work after Christmas too.
This is a good one if you like natural Christmas decor but do not want the house to look like a cabin gift shop.
Best for: mantel, staircase, console, tree
Difficulty: easy
Budget: very low
Hands-on time: about 30 minutes
Tie pinecones along a length of sturdy twine.
Add a few wooden beads between them.
Leave some open twine. Do not cover every inch.
For a softer finish, dry-brush only the pinecone tips with white paint.
For a warmer look, leave them natural and add burgundy or green ribbon.
These are perfect when you want small tabletop decor that you can adjust to match your room.
Best for: mantel, dining table, bedroom dresser, console
Difficulty: easy
Budget: low
Hands-on time: 30 to 45 minutes
Try:
Make three trees at different heights.
I would rather see three strong trees using related fabrics than nine little cones wearing every pattern in the Christmas aisle.
A trio also works beautifully alongside other weekend DIY home projects if you enjoy projects you can finish without donating your entire Saturday.
Save the pasta sauce jars.
They are about to look much better.
Best for: mantel, shelf, dining table, window
Difficulty: very easy
Budget: very low
Hands-on time: 20 to 30 minutes
You can compare battery flameless tea lights on Amazon USA if you do not already have some.
Frost the lower half.
Tie one clean ribbon around the rim.
Add a battery light.
Done.
You do not need fake berries, three charms, a wooden snowflake, lace, glitter, bells, and twine on the same jar.
Let the glow be the decoration.
For candle-style Christmas displays, the U.S. Consumer Product Safety Commission recommends flameless candles when possible and keeping burning candles away from materials that can catch fire. Their holiday decorating safety guide is worth a quick read if you use real flames or electric lights in seasonal displays. U.S. Consumer Product Safety Commission
This one looks good because the ingredients are simple.
Best for: dining table, coffee table, kitchen island
Difficulty: very easy
Budget: low to moderate
Hands-on time: 20 to 30 minutes
Place the candles first.
Add greenery around the base.
Then add pinecones and a small number of ornaments.
Vary the candle heights if you can.
For a dining table, keep the whole arrangement low enough that people can still see each other.
Nobody wants to spend Christmas dinner leaning sideways around a decorative forest.
No room for another full tree?
Use a branch.
Best for: console, dining room, bedroom, apartment
Difficulty: very easy
Budget: very low
Hands-on time: 15 to 30 minutes
Choose a branch with several smaller offshoots.
Secure it so the vase cannot tip.
Then hang a small group of ornaments.
This is a good place for:
Leave some branches bare.
The empty spaces help the ornaments show up.
You get a surprisingly big effect because the idea repeats around the table.
Best for: dining chairs, kitchen chairs
Difficulty: easy
Budget: low
Hands-on time: about 10 to 15 minutes per chair
Tie a few greenery pieces together.
Cover the wire with ribbon.
Attach each swag securely without scratching or staining the chair.
Repeat the same design on every chair.
Do not make six different ones unless your Christmas theme is “I changed my mind halfway through.”
Finish with a project that can move from the table to the tree later.
Best for: Christmas dinner, place settings, gifts
Difficulty: easy
Budget: low
Hands-on time: 10 to 15 minutes each
Form a small wire ring.
Wrap greenery around it.
Cover the join with a tiny ribbon.
Slide one around each folded napkin.
After dinner, add a hanging loop and use the mini wreaths as:
I love a project that refuses to become useless after one meal.
Do not choose by what looks impressive online.
Choose by where your house currently feels empty.
Start with:
Try:
Make:
Try:
Go for:
That is also a good reason to keep room decor simple. These DIY living room ideas are useful if your bigger goal is a home that looks put together without buying everything new.
Here is the part I wish more DIY lists explained.
The difference between “I made this” and “Where did you buy that?” is often five extra minutes at the end.
Choose two or three.
Let them show up in several places.
That repetition makes the room feel connected.
If you use velvet ribbon on the wreath, use a little on the garland.
If you use natural wood beads on the tree, repeat them on the mantel.
One cone tree can feel random.
Three at different heights feel intentional.
One paper star is cute.
Five together become the feature.
Cut visible wire.
Trim glue strings.
Straighten the ribbon.
Clean fingerprints from glass.
Touch up raw cardboard edges.
These tiny jobs matter.
If the wreath already looks good, another ornament will not necessarily make it better.
Sometimes your best decorating move is putting the extra bell back in the box.
If your $100 is for several projects, not one, this is the order I would use.
Pull out:
ribbon
old ornaments
jars
frames
cardboard
fabric
paint
pinecones
vases.
Usually:
floral wire
twine
glue.
Choose:
ribbon
greenery
wood beads
paper.
Use it across several DIYs.
Only then buy:
the hoop
clay
cone forms
specialty paper.
This keeps you from spending $14 here, $11 there, $8 somewhere else, and somehow discovering that your “cheap Christmas project” now has its own expense report.
You can save a surprising amount by skipping supplies that do not add much.
I would think twice about:
Before buying a new base, ask:
Could I use a tray, bowl, frame, vase, jar, or basket I already own?
That single question can cut the shopping list fast.
A homemade decoration should be cute, not exciting for the fire department.
For projects with lights or candles:
The CPSC’s current holiday guidance recommends flameless candles where possible and warns against unattended candles and overloaded electrical outlets. U.S. Consumer Product Safety Commission
If you have toddlers or curious pets, also think about tiny beads, wire ends, breakable ornaments, and anything hanging at grab-me height.
Large ribbon bows, paper stars, framed seasonal art, jar lights, and branch ornament displays are good starting points because they use simple steps and forgiving materials. Pick the project that needs the fewest new supplies if this is your first DIY Christmas.
Yes, none of the 15 ideas in this guide requires a Cricut or cutting machine. Scissors, wire cutters, glue, a ruler, and a basic utility knife cover most of the projects.
Use fewer colors, repeat the same ribbon or texture, group similar items, hide glue and wire, and leave some empty space around the finished display. One strong focal point often looks better than covering every surface with small decorations.
Yes, especially when several projects share materials and you begin with jars, frames, cardboard, ornaments, or ribbon you already own. Choose four or five projects from this list first, then shop only for the gaps instead of buying supplies for all 15 at once.
The best DIY Christmas decorations for adults are the ones you enjoy enough to bring out again next year.
Maybe your thing is a quiet clay ornament.
Maybe it is a giant velvet bow on the door that can practically be seen from the next postal code.
Maybe it is the cardboard village you made from a box that arrived with something far less interesting inside it.
Pick a few.
Repeat your colors.
Use what you already have before shopping.
And give each finished piece enough room to be noticed.
A home does not feel special at Christmas because every corner is full.
It feels special because the things you chose feel like they belong there.
Explore original printables, find another story or save your next creative project.